Showing posts with label Fuselage. Show all posts

Sunday, March 4, 2018

Fuselage Taking Shape

Holidays and work projects really slowed down my posts, but I made some good progress on the front of the fuselage.  Another Saturday, and I should be ready to start building the rear fuselage.

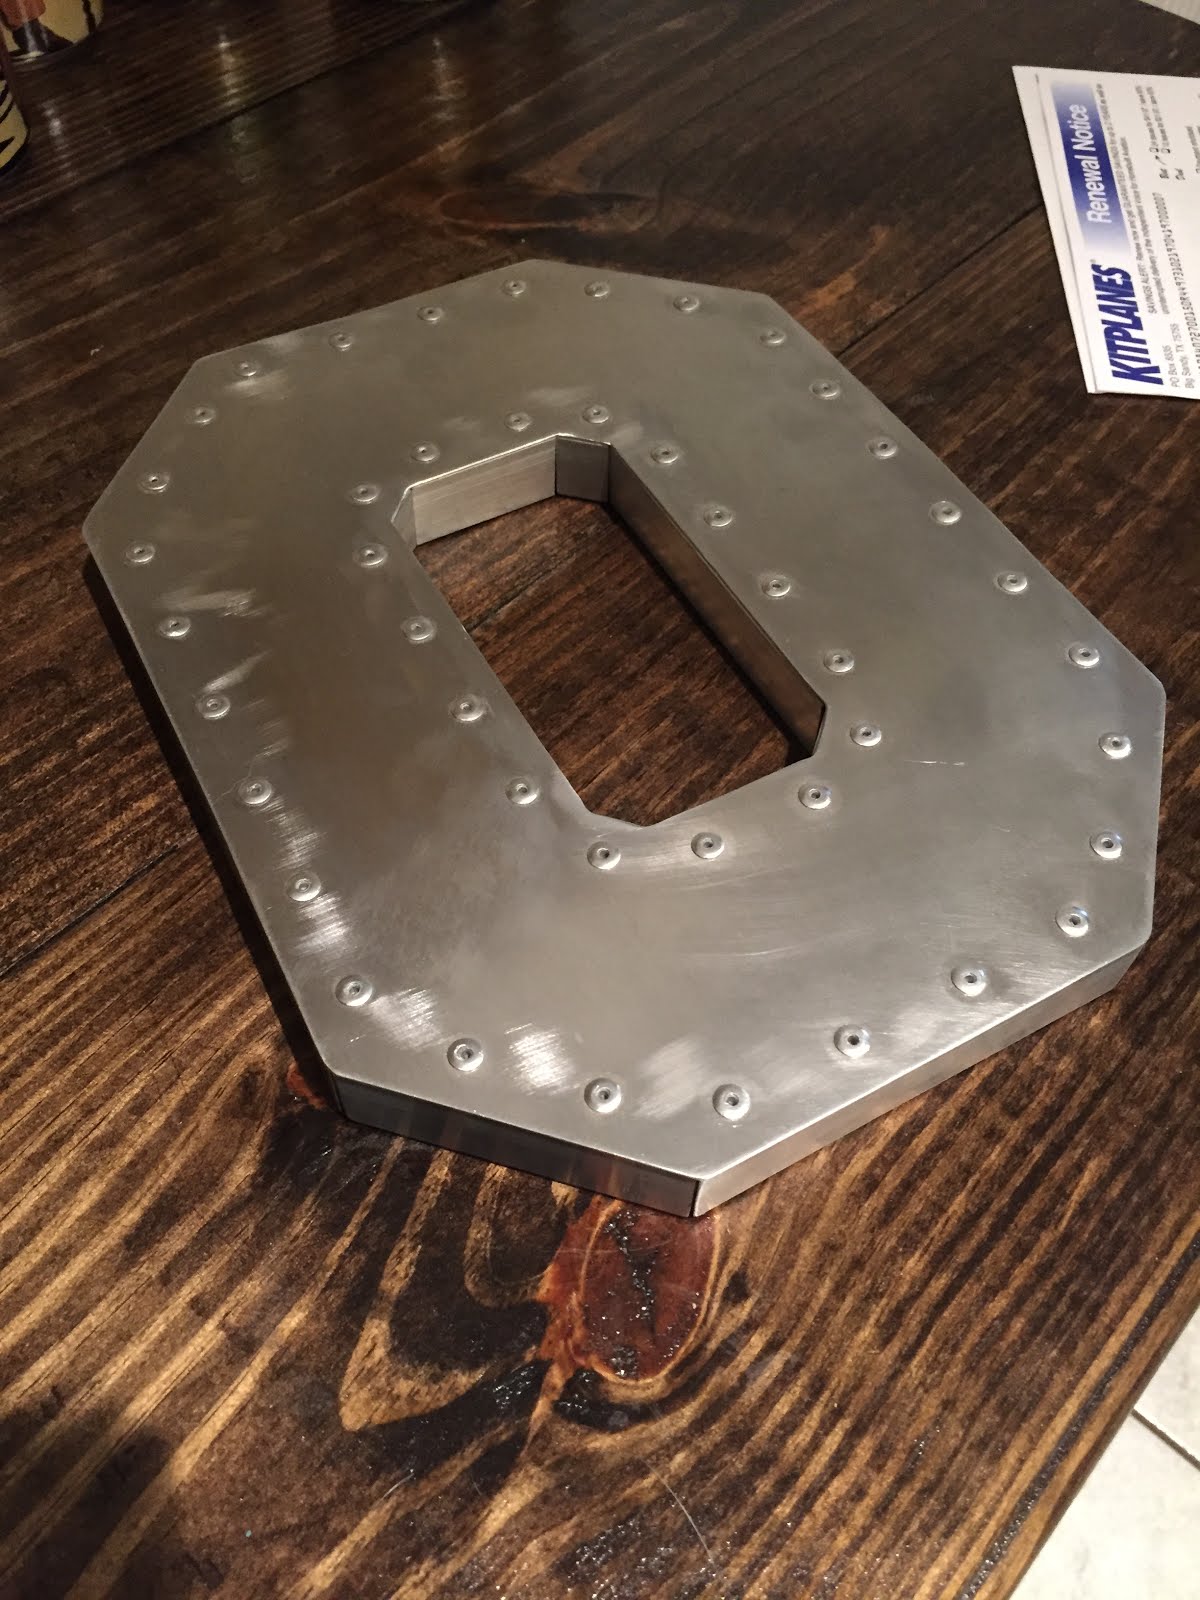
I received the bulkheads from Greg Westberry a while back, but I kept them in the box until now.  I'm really glad I bought these because each shape would have required two custom cut blocks to form them (The pieces that look like "O"s are made up of 4 pieces each).  So it saved me from creating and hammering on 46 custom blocks.  Unfortunately, Greg has stopped making these.  Hopefully, someone else with a shop will jump in and take over.


Mounted the firewall supports (will have to drill these out because the rivets are facing the wrong way.  Not a bid deal, but I want them the other way).


Breathed some new life into an old computer and added it to the shop.  It's a big help for looking up parts and other's pictures, but Youtube keeps sucking me in!


Lower Longeron Work (There's a great document on the Yahoo group Files called "Lower Stringer" that helps with bending these).


The brackets to attach the lower longerons to the spar.


Getting somewhere


Making airplane noises


Bending and cutting the upper longeron.  The bandsaw was a big help here.  Watch that your circle doesn't cut into the longeron since this part will be visible when you open the canopy.  I ruined one by cutting 1/2" in.  If you look at the plans, it says "no more than".


After lots of grunting and swearing the rough cuts and bends look good temporarily set in place.


Finishing them
Before


After (I need to cut this down and bend inward on the trailing edge, but I will do that once I see the aft fuselage setup).


All squared up with temporary supports holding up F6 (Seat back).  It feels pretty solid.  You can also see the 1/4" bar stock supporting the inside of the lower longeron.  Second picture shows more.


Closer shot with the vertical 3/4 angle in place and F3 bulkhead temporarily clamped in place.


Most everything is clamped together for fitting before I drill and bolt everything in place.  More to come, but I'm tired now!


Saturday, December 9, 2017

Hurricanes, a Left Wing, a Change of Plans, New Tool, 3d Printing, and Beginning the Fuselage

That's quite the title, but it's been a really long time since I've updated this log, and a lot has happened.

Hurricane Irma

We live in the Tampa Bay area, and Irma was originally heading our way.  It's never good when your weather man makes this face...


So, I put a halt to building, stacked anything important on top of my workbench in case we got any flooding, secured the garage door with some 2x4's, and hit the road to Charlotte.  The storm took a last minute turn, and my CX4 project lived to see another day.

Left Wing Progress

The left wing is basically done.  I'm leaving the trailing edge off until I have the ailerons so I can make sure the trailing edge of the aileron lines up with the trailing edge of the wing tip.  Here are a few pictures, but basically the same thing as the first wing but on the left side.  I decided to cut the hole in the left wing for pitot static hardware later as mentioned in the build manual.  I'm wondering if it would have been easier to fit the parts while the wing was open.  I guess I'll find out.

Also, the change of plans part of the title is that I decided to buy the ailerons from Greg Westberry.  I don't think mine are right (they don't fit the aileron ribs from the plans), and to rent a truck and a bending brake is almost the cost of the parts minus shipping.  I'll have a separate section for all of the parts I bought from Greg in case anyone is interested.


New Bending Brake

I needed to make a new left wing tip spar, and decided to pick up the Harbor Freight bending brake.  So far, I'm very happy with it!  Here I taped on some bent 020 to increase the bend radius so I don't work harden the material.


Playing around


3D Printing

I have a small 3D printer, and I hope to find ways to use it on this project.  I was thinking the air vent might be a good fit for 3d printing.  Anyhow, I needed to make a new Scotchbrite wheel fit my drill press for deburring.  So I drew up a part, printed it, and it worked really well.  It took about 20 minutes from drawing the part to final product.


Highly recommend the Scotchbrite wheel for deburring.

Starting the Fuselage

The pictures speak for themselves.  The best part was bolting the wings together.  24' is pretty long in a single car garage!


Louie makes an appearance with the forming block...


The seat...


So cool to see the wings bolted on.


And the wings stacked and stored so I can work on the fuselage now...


A present for my dad

I went to Ohio State (forever ago!), and I wanted to get my dad a block-o for his outside bar.  It turns out that no one really makes a good one.  So I decided to use some 6061 and make him one that will hold up.  I was happy with the results...


More to come, but time for a xmas party with the friends...


Sunday, October 9, 2016

Fuselage Bulkheads Arrive

Hurricane Matthew slowed things down this week, but I did receive the bulkheads that I ordered from Greg Westberry.  I'll do a full review of these and the tail kit when I get to them, but there's a lot of wing left to build yet!  Looks like they make nice quality parts though.


Friday, April 22, 2016

Rough Cut Wing Ribs and Bulkheads

UPDATE:  I've since decided to buy the bulkhead kit from Greg Westberry.  Yes, the work in this post was a waste, but making all of the wood forming blocks was going to take a lot of time.  

Last night I used my air shears for the first time.  They're the greatest thing since the Olfa cutter (which was yesterday)!  I traced all of the .040 pieces onto the metal (mostly fuselage bulkheads) and rough cut them with the air shears.  Smooth like butter!

I also cut out .020 ribs and one leading edge.  My goal was to breakdown the 4x12 sheets of aluminum into a pile of something more manageable in a one car garage so I can have room to build my spar.

Here are some pictures...

Cutting bulkheads


Stack of rough rib blanks.  I'm going to use a router and a wood form to make the final shapes 4 at a time.


Rough cut leading edge of one wing


Time to go to work!


Wednesday, April 20, 2016

Markers, Templates and Web Spars

After a business trip, a cruise, and the flu; I'm back building.  I snuck in a few hours here and there and managed to get the ribs all traced onto a sheet of .020 6061, traced/cut out all of the .040 part templates onto paper templates, and tonight I measured and cut my spar webs.

Here are some pictures...

The .020 sheet marked up for the rib blanks.


Tracing paper templates and the results.  Sometimes I just cut straight from the copy I made of the plans.  When templates overlapped each other, I traced them using some tracing paper.


Cutting web spars with the Olfa PC-L cutter.  This thing is great.  If you're debating going this route, it was $11 on Amazon.  Measuring and cutting all three took me an hour, and the results are impressive.  It even comes with extra blades in the handle.  Well worth the investment.


Using the Olfa.


The cut web spars.


Wednesday, April 6, 2016

Mylar Templates

Instead of going to Sun-n-Fun, I started to cut out the templates, and way under-estimated the amount of time it will take to get everything cut out.  I spent two hours cutting out the main rib templates, F2 and F7 and transferring them to mylar to later cut out of metal.

I think I'll just make the patterns that are used more than once out of mylar.  Otherwise, I'll just cut them out of the copies I made of the plans to help reduce the time.   That reminds me, I made copies of my plans at a blueprint printer based on some reading I did online.  Two copies of the full set of plans was about $40.  I thought that was reasonable assuming the whole airplane should be about $20,000.

I was nervous about the copies not being accurate, so I used some plexiglass I had laying around and made a quick light box by arranging some boards and a flashlight.  Here is a really bad shot of the end result...


I laid the copies on top of the originals sheet by sheet, and found them to be spot on accurate.  Here is a close up of two plans on top of each other.


Here are the templates I made today.  I keep calling them mylar, but they are basically plastic poster board from Michaels.  Florida gets humid, so I thought they would hold up better.  I also have about 5 other templates cut out of the plan copies that are still just on paper.  I spent about an hour reviewing the plans trying to decide what to do when the templates overlap on the plans.  Dave did this occasionally to fit more on one sheet of paper.  Not a big deal,  just wanted to be sure I wasn't missing anything.  If you notice, there are two rear rib portions.  There is a slight variance in ribs 1-4 to accommodate the spar caps.